Table of Contents
- Getting Started
- Viewing Infrastructure Data
- Adding Infrastructure
- Editing Infrastructure
- Service Provider Administrators
- CIDeR Administrators
- CIDeR API
Getting Started
Anyone with an ACCESS ID can log in and view resource information. Visit https://cider.access-ci.org and follow the ACCESS login process.
If you need permission to edit resources for a current resource provider ask a current CIDeR administrator for your organization to add via the Organizations section in CIDeR. If this isn't possible make a request at https://support.access-ci.org/open-a-ticket.
If you are representing a new CyberInfrastructure provider request that your organization be added as a provider in CIDeR at https://support.access-ci.org/open-a-ticket.
Viewing Infrastructure Data
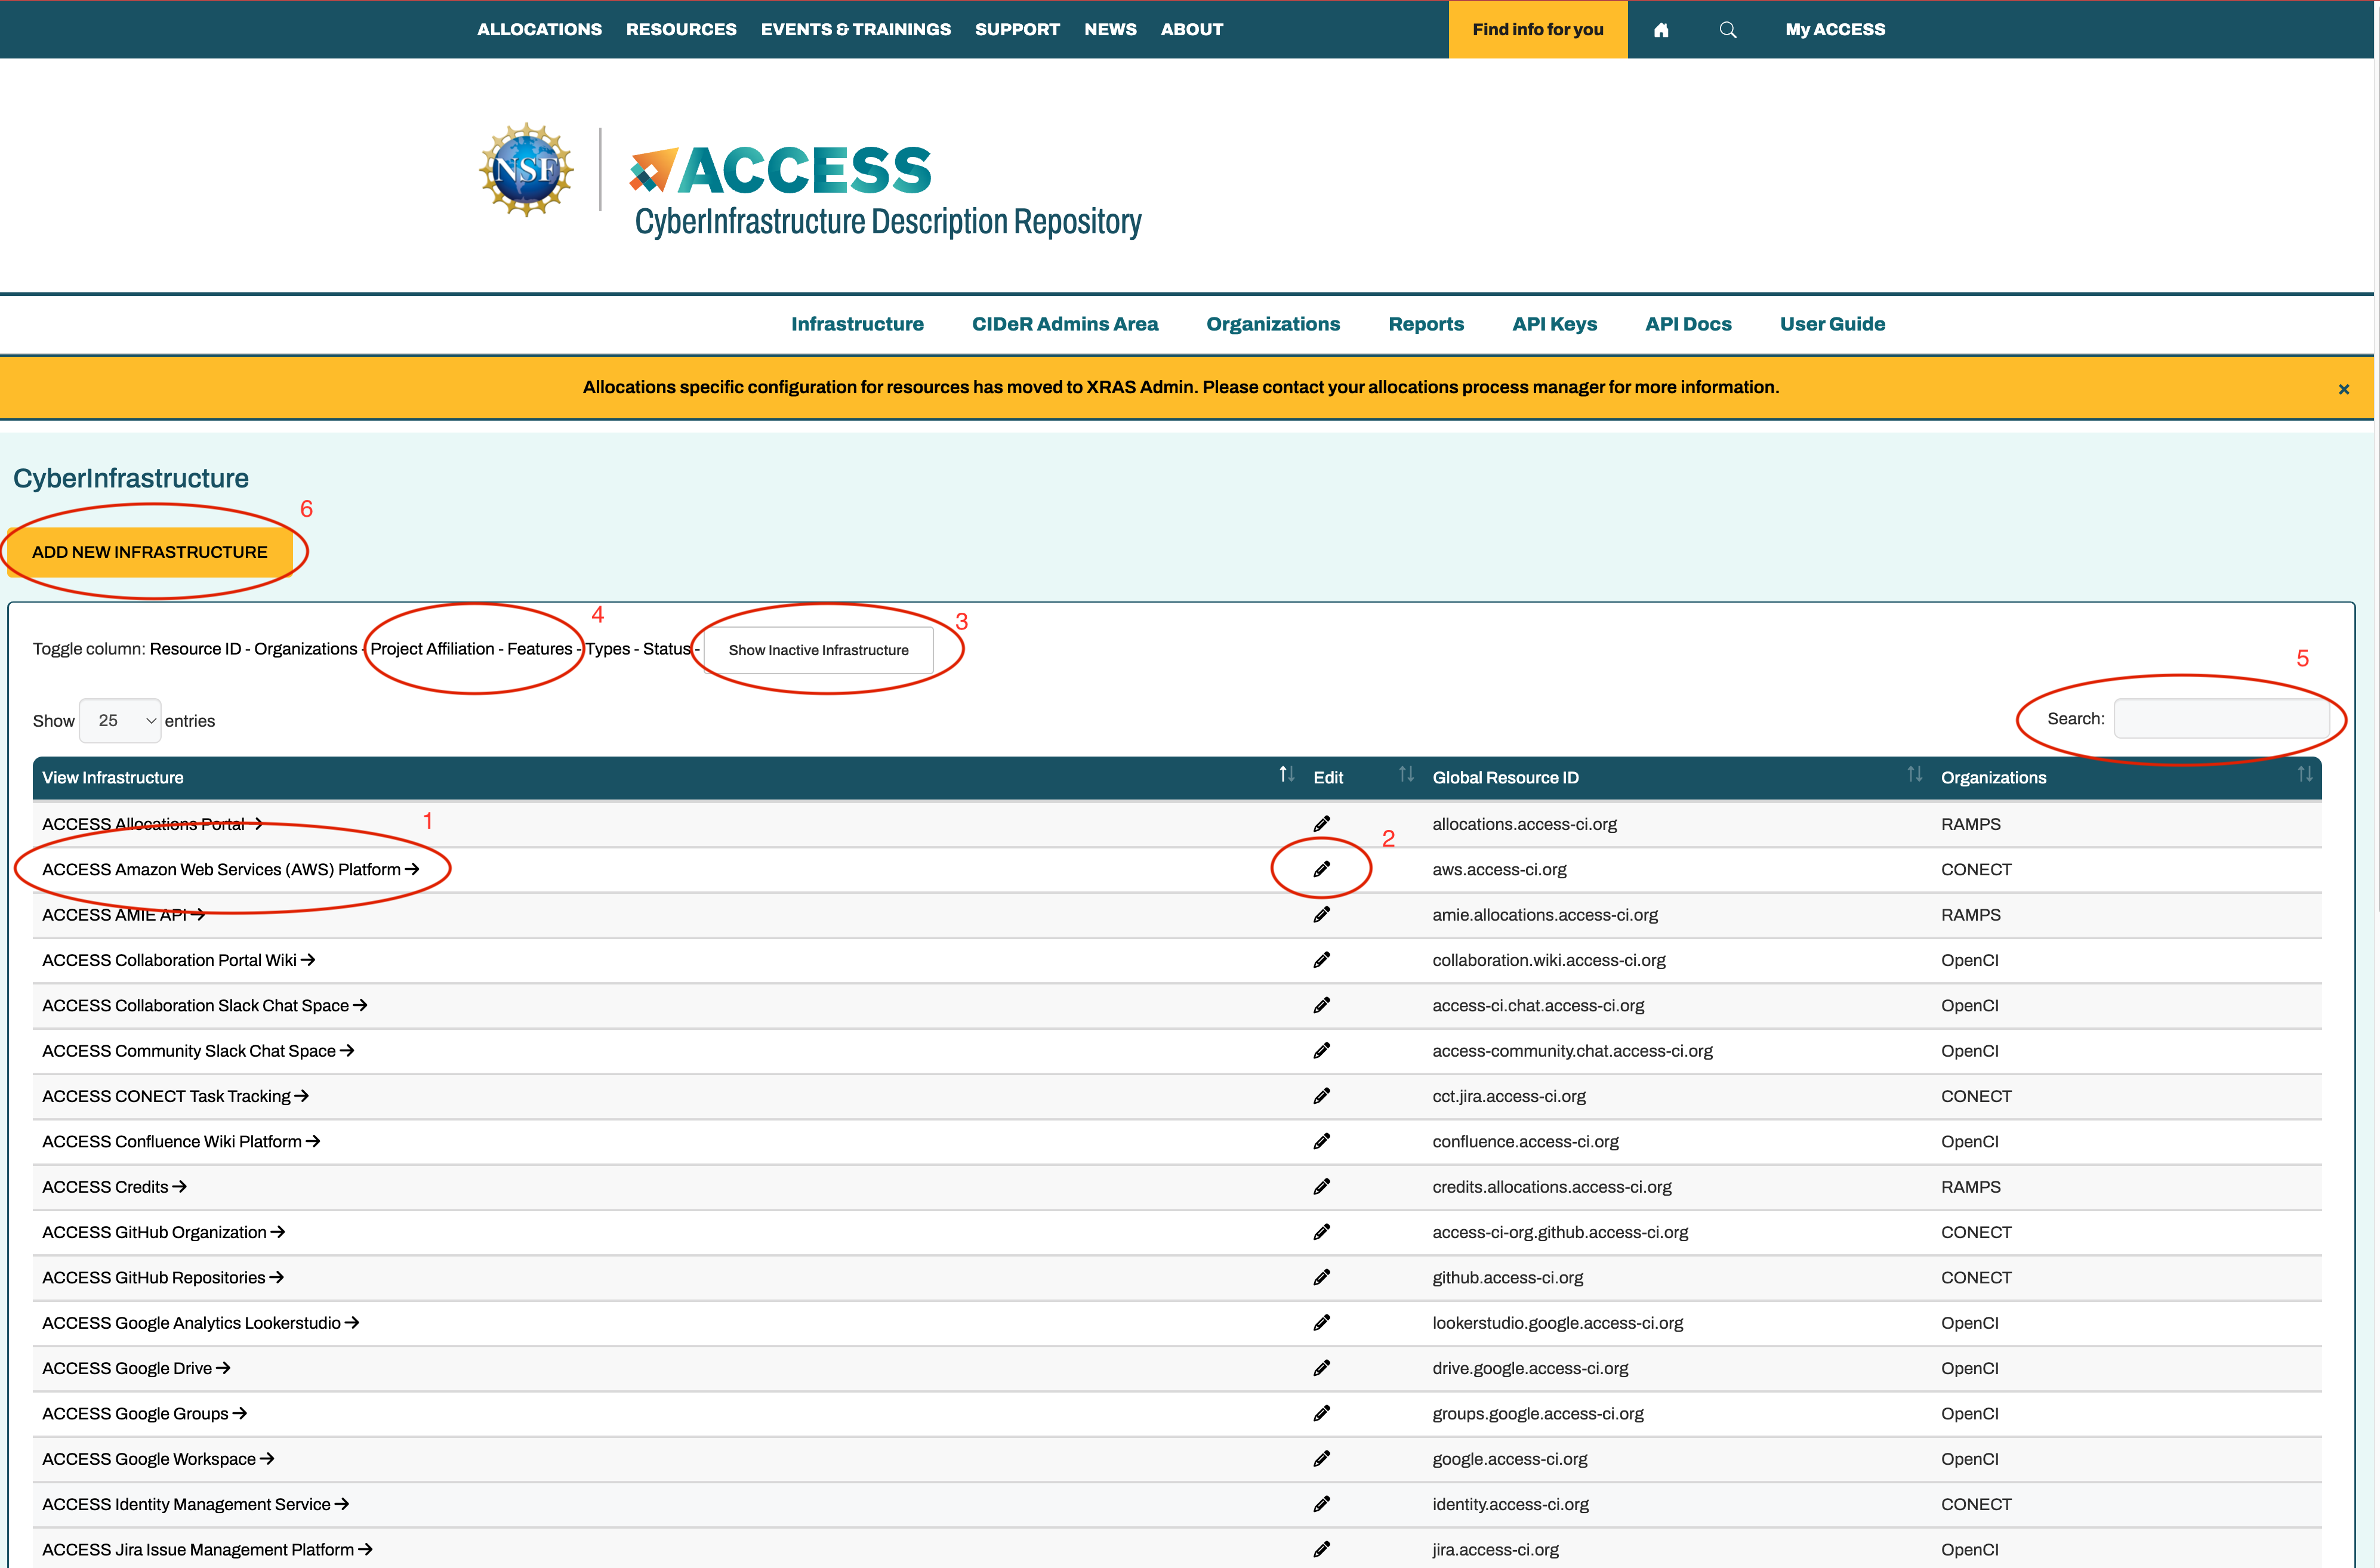
The Infrastructure index acts as the front page of CIDeR and can also be reached by clicking the Infrastructure link in the menu bar.
From this page you can (each numbered item in the list is circled and numbered on the below screenshot):
- Click an infrastructure name to view information about that infrastructure
- If you have edit permission for the infrastructure there will be a pen icon that you can click to go to the edit page.
- Infrastructure that is in the decommissioned state based on entered dates do not appear by default. Additionally infrastructure that doesn't have a status defined by dates yet will also not appear. To show all resources click the Show Inactive Infrastructure button.
- You can also view additional information for infrastructure on this page by toggling columns above the table.
- Find resources quickly by using the Search box to filter the infrastructure list.
- Add new infrastructure. This button will appear if you have permissions to manage infrastructure for a provider. This will be covered later in the documentation
Infrastructure View Page
When you click to view an infrastructure you'll be brought to a tabbed interface to see the information that has been entered.
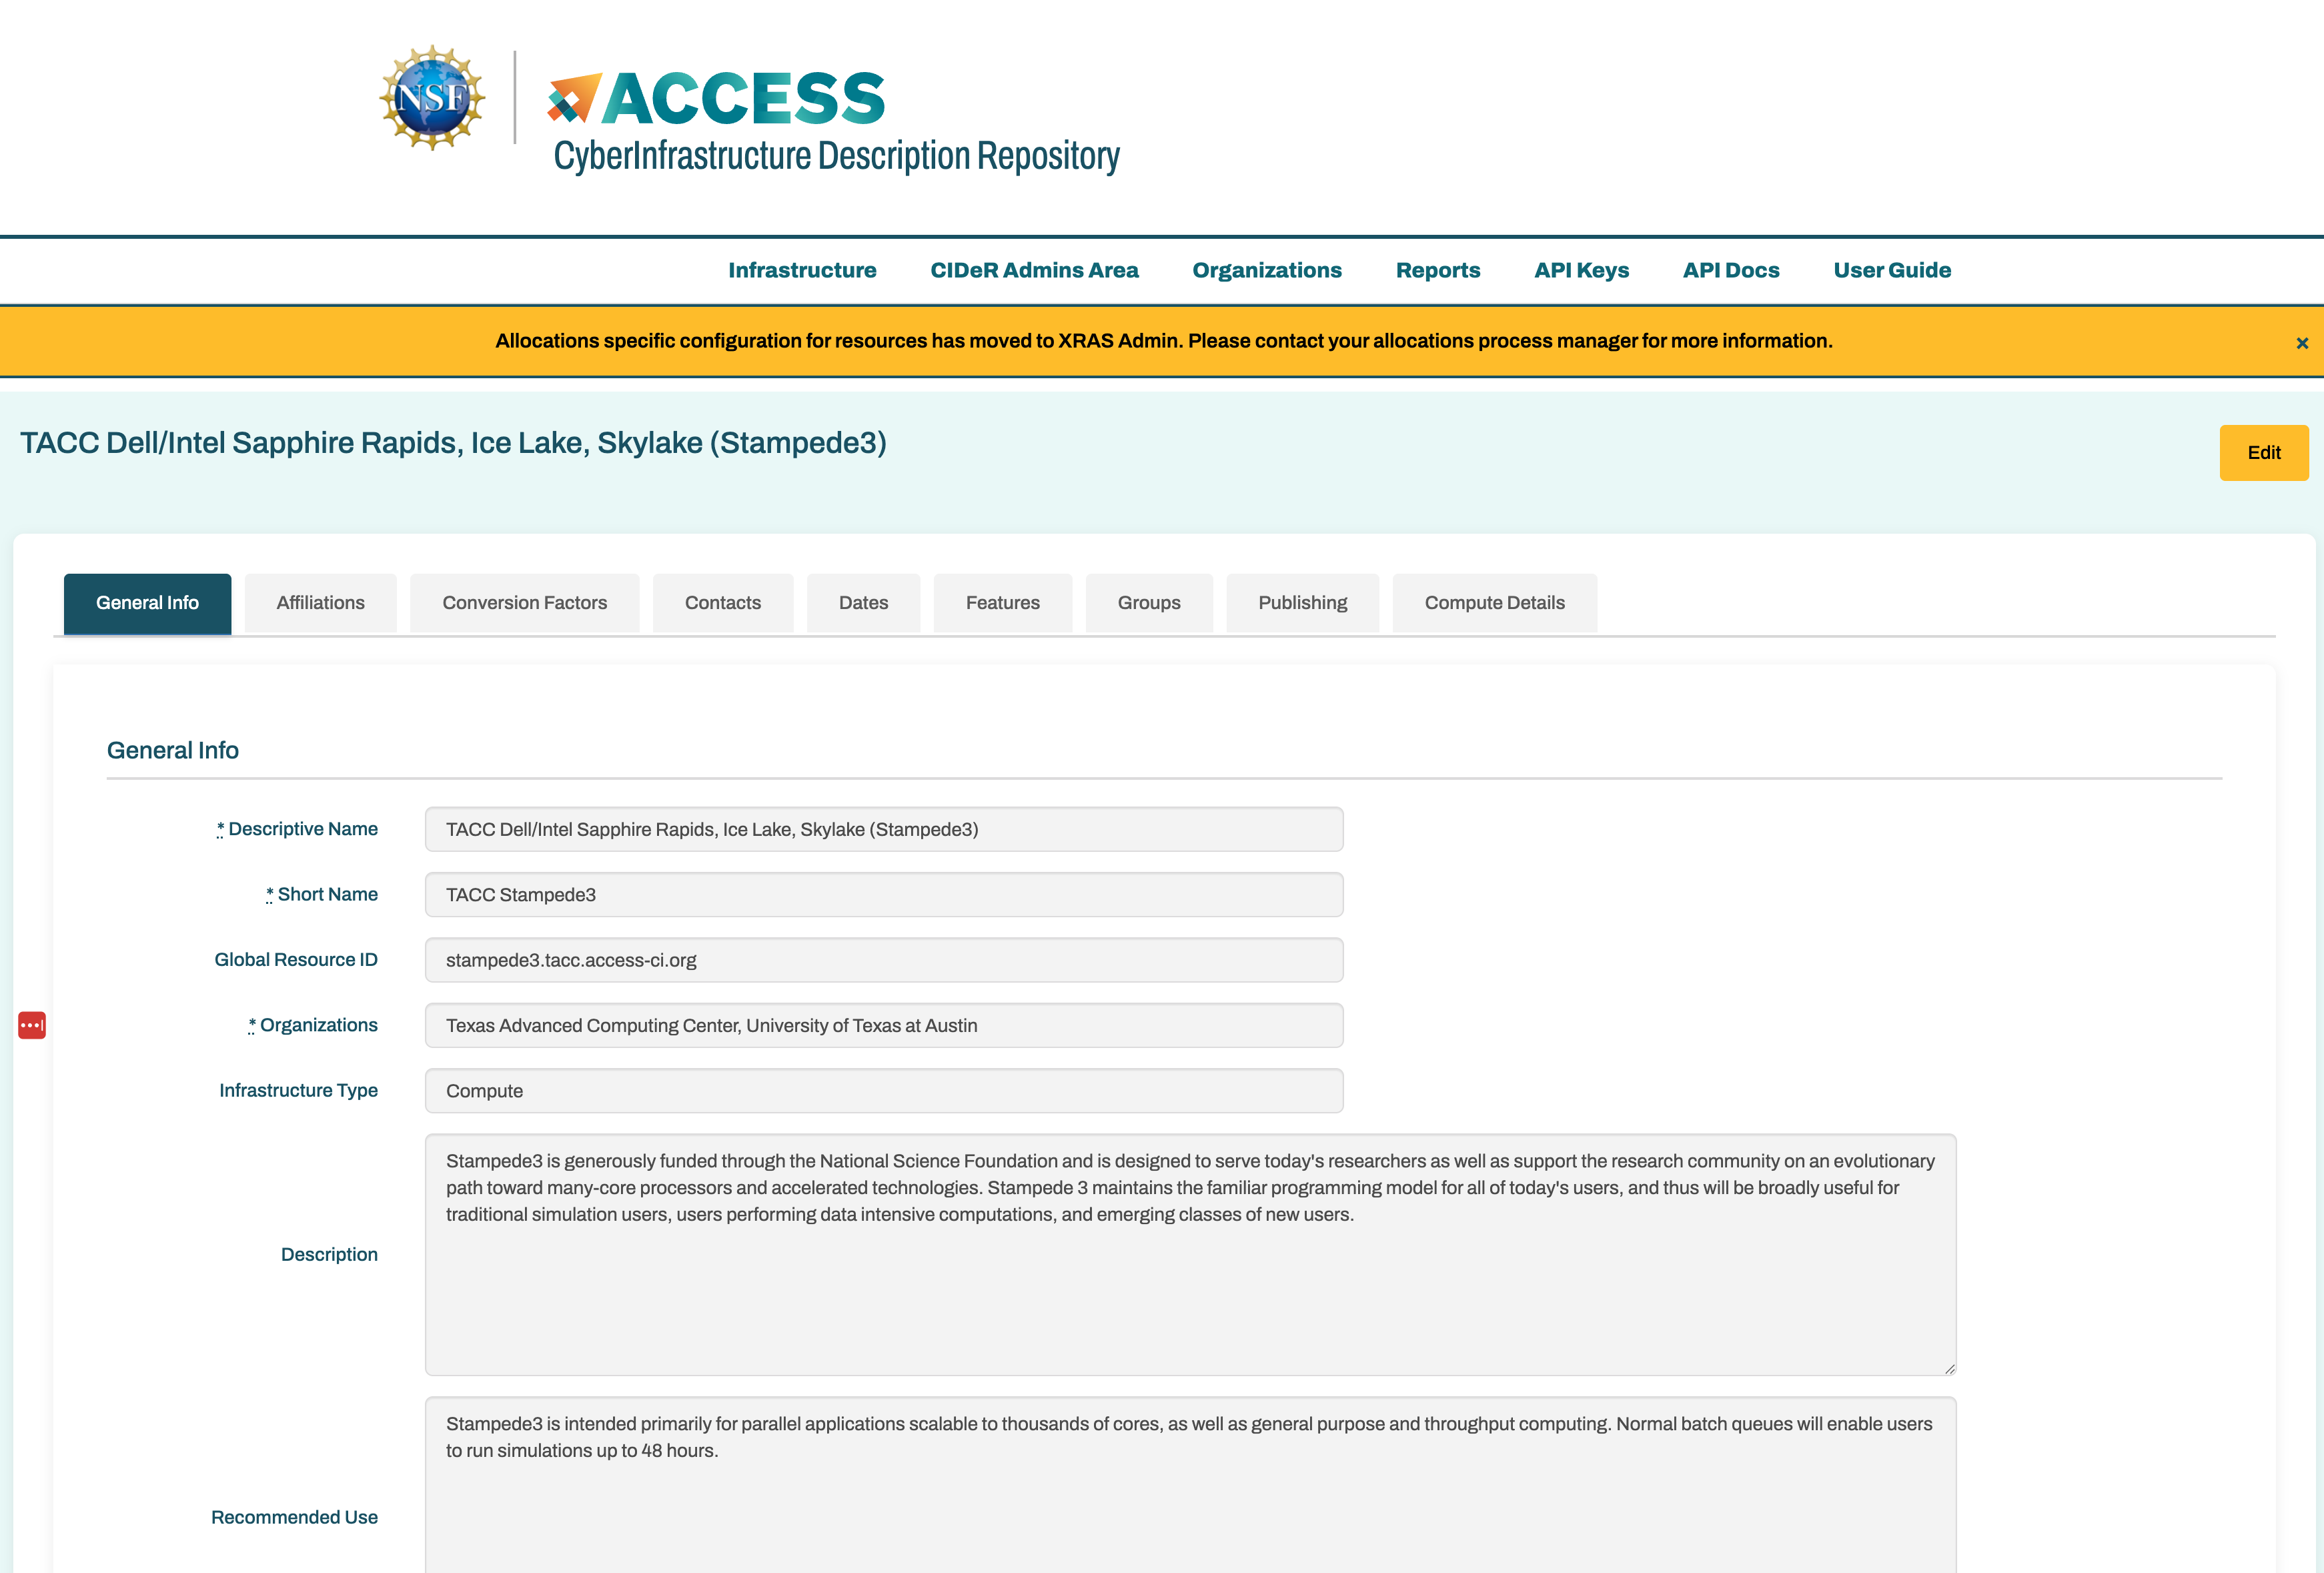
There will be up to nine tabs:
- General Info
- This include data such as names, id, organization, descriptions
- Affiliations
- These are the affiliations that the infrastructure is part of such as XSEDE and ACCESS. If the infrastructure is allocated via XRAS via an affiliation's allocations process those affiliations must be added here. For example if SuperComputerX is allocated by ACCESS and also an NCSA XRAS instance then both ACCESS and NCSA will to be entered here.
- Contacts
- Contact information for various aspects of the infrastructure including security, allocations, networking, etc
- Contact information is only visible to people with full or resource provider admin permissions.
- Conversion Factors
- The conversion factor is the rate used to compare infrastructure for reporting purposes.
- This is not the rate used for ACCESS credit to Allocation service units. That rate is the 'exchange rate' and is managed in XRAS Admin.
- Dates
- Defines the dates for various stages of an infrastructure lifecycle including announcement, pre-production, production, post-production, and decommissioned
- Features
- Features that apply to this infrastructure including topics such as science gateways, specialized support features such as Open OnDemand, etc.
- Groups
- Groups that this infrastructure have been included in. Groups can only be created by full CIDeR admins. Current example of groups include Expanse, which includes Expanse CPU, Expanse GPU, and Expanse Storage so these resources can be displayed together in the ACCESS resource catalog.
- Publishing
- Shows whether the infrastructure has publishing permission and if so the public URL that is used.
- Publishing is currently used to add allocation information to researcher ORCiD profiles.
- Specific Type Details
- Specific detail based on the type of the infrastructure. For example CPU type and speed for compute resources and file system type for storage resources.
- This tab will not appear for "Other" type resources
Adding Infrastructure
Begin adding new infrastructure by clicking the ADD NEW INFRASTRUCTURE button (#6 in the below screenshot) from the CIDeR front page. You can get back to the front page by clicking Infrastructure in the menu bar under the heading.
Add Infrastructure Form
What is "CyberInfrastructure"? — For the purposes of CIDeR, a "CyberInfrastucture " is:
- a system, possibly heterogeneous, managed under a common set of policies. In particular, if you are allocating a system (or part of a system) separately, it should be a separate resource.
- This may be best explained by examples:
- While Bridges-2 may sometimes be considered a single system, because it is allocated as Bridges-2 Extreme Memory, Bridges-2 GPU, Bridges-2 GPU-AI, Bridges-2 Regular Memory, and Bridges-2 Ocean, each of those allocated components must be entered as a separate infrastructure in CIDeR.
- In contrast, the Stampede-2 system comprises KNL and Skylake nodes, but it is allocated as one system; therefore, it is entered as a single resource with two partitions (a KNL partition and a Skylake partition).
- If your resource is not being allocated by ACCESS or another XRAS allocations process, you should follow the Stampede-2 approach.
- Do not enter your research computing facility or department as an infrastructure; each system should be entered separately.
On the add infrastructure form you'll enter general information and select appropriate affiliations.
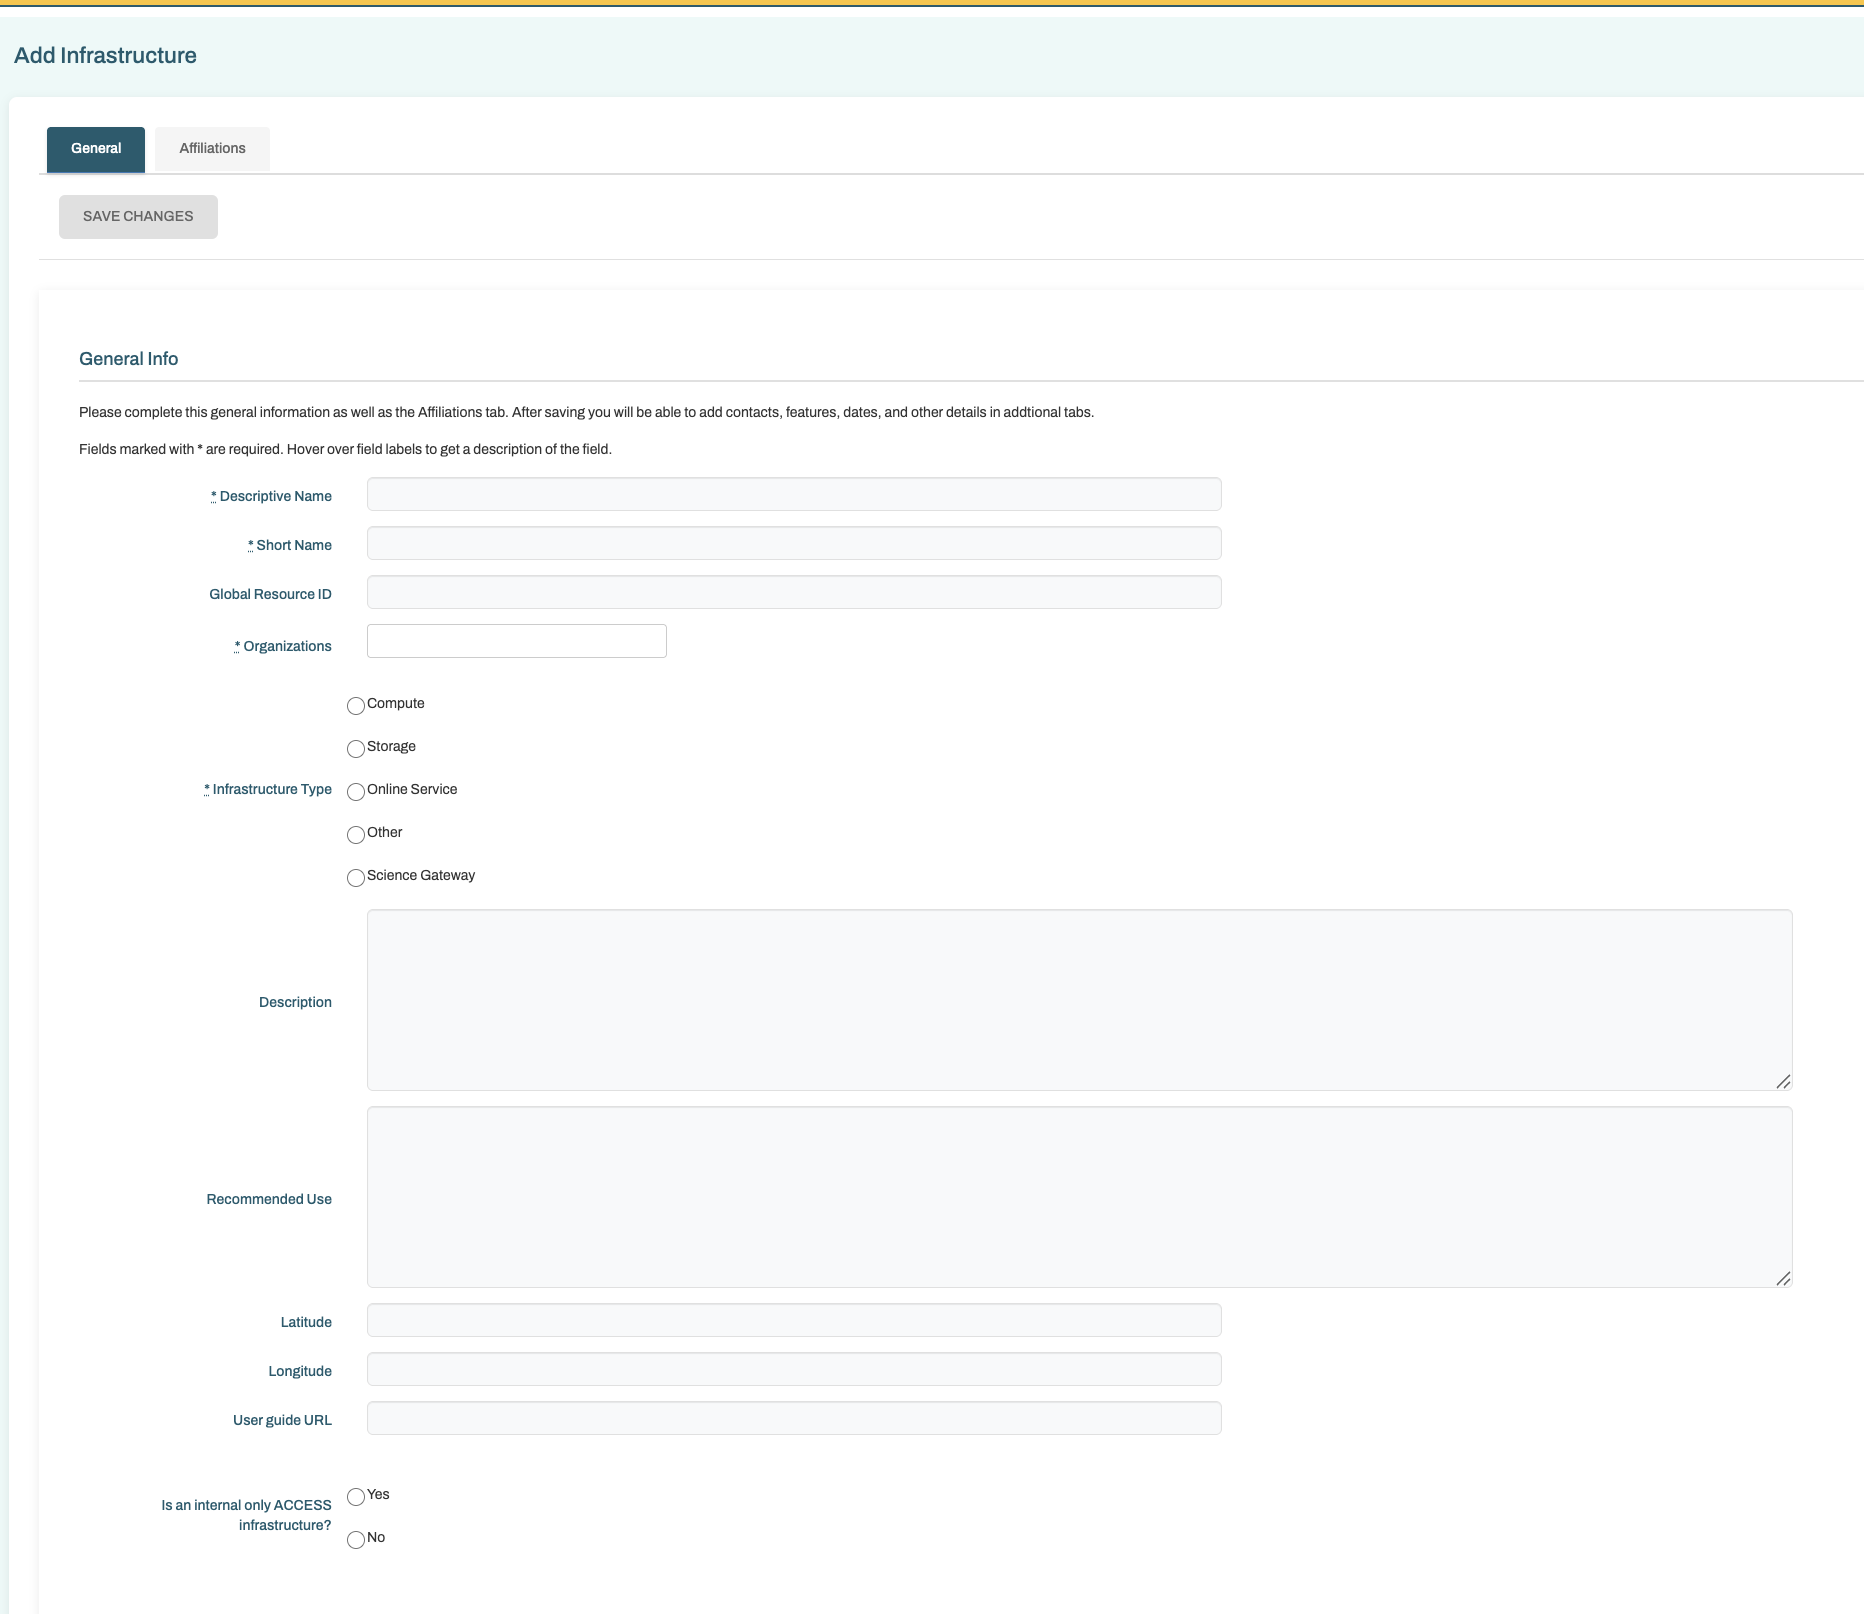
- Resource Descriptive Name is required. For an ACCESS resource the entered name should be consistent with other ACCESS resources "RP Abbreviation Short hardware description (Short name)" for example for Comet at SDSC the descriptive name is SDSC Dell Cluster with Intel Haswell Processors (Comet)
- Global Resource ID is the globally unique user friendly identifier for infrastructure.
- It is DNS-like and often visible to users when browsing resource information.
- This field is required for all infrastructures publishing information to information services.
- The domain portion of a Global Resource ID must represent a real resolvable internet domain for the organization operating the infrastructure or of the federation that the infrastructure is affiliated with.
- For ACCESS infrastructure this ID should have the form name.site.access-ci.org.
- For example comet.sdsc.access-ci.org
- For non-ACCESS infrastructure, or campus resources it should have the form name.domain, for example, cheyenne.ncar.ucar.edu or bw.ncsa.uiuc.edu
- Note the "name" portion of the ID should not contain any periods "."
- If an ACCESS infrastructure has multiple separately allocated divisions each should be created as its own infrastructure with a distinct Global Resource ID.
- For example bridges.psc.access-ci.org, bridges-gpu.psc.access-ci.org where GPU nodes are separately allocated.
- The Global Resource ID is used to join various infrastructure information across many ACCESS services. This ID should not be changed, so choose carefully.
- Multiple Organizations may be entered by selecting each individually from the drop down.
- The infrastructure type is a limited list. Please select the most appropriate choice for the infrastructure. Infrastructure that is primarily for computation whether it is primarily CPU, GPU, or another accelerator should be Compute.
- The infrastructure type can not be changed after creating the resource
- The "Is an internal only ACCESS infrastructure" checkbox denotes infrastructure used by ACCESS staff and services that should not be advertised to users.
- Affiliations must be entered in the second tab. They should be used to denote which federations the infrastructure should appear in. Multiple affiliations can be added. For example if Delta is an ACCESS resource and is also allocated using the NCSA XRAS allocations process for some allocations. Delta needs two rows here, for ACCESS and NCSA.
Click the SAVE CHANGES button above the form to finish creating the infrastructure. After saving many other tabs will appear. These are explained in the Editing Infrastructure section.
Editing Infrastructure
Infrastructure that you have permission to edit will have a pen icon in the edit column on the main CIDeR infrastructure page. You can click this pen to edit. When viewing an individual infrastructure there is also an edit button to the upper right.
The edit screen looks much like the view infrastructure screen, but the form elements are editable.
In addition to the General and Affiliations tabs that are covered in the Adding Infrastructure section there are now additional tabs to enter more infrastructure detail.
- Contacts
- Contact information for various aspects of the infrastructure including security, allocations, networking, etc
- Contact information is only visible to people with full or resource provider admin permissions.
- Conversion Factors
- The conversion factor is the rate used to compare infrastructure for reporting purposes.
- This is not the rate used for ACCESS credit to Allocation service units. That rate is the 'exchange rate' and is managed in XRAS Admin.
- Changes to this rate over time should be preserved if the value is changing because of updated hardware or software.
- Dates
- Define the dates for various stages of an infrastructure lifecycle including announcement, pre-production, production, post-production, and decommissioned
- Features
- Select features that apply to this infrastructure including topics such as science gateways, specialized support features such as Open OnDemand, etc.
- Groups
- Groups that this infrastructure should be included in. Groups can only be created by full CIDeR admins. Current example of groups include Expanse, which includes Expanse CPU, Expanse GPU, and Expanse Storage so these resources can be displayed together in the ACCESS resource catalog.
- Publishing
- Select whether ACCESS has publishing permission to publish some information about the infrastructure.
- Publishing is currently used to add allocation information to researcher ORCiD profiles.
- A Public URL can be specified if you'd prefer not to use an ACCESS generated page. Note that this page is expected to be available for historical purposes and should not be a page that will be removed when the infrastructure is decommissioned.
- Specific Type Details
- Specific detail based on the type of the infrastructure. For example CPU type and speed for compute resources and file system type for storage resources.
- This tab will not appear for "Other" type resources
When any data in the form is changed the SAVE button at the top of the form will enable and you can save the changes.
Service Provider Administrators
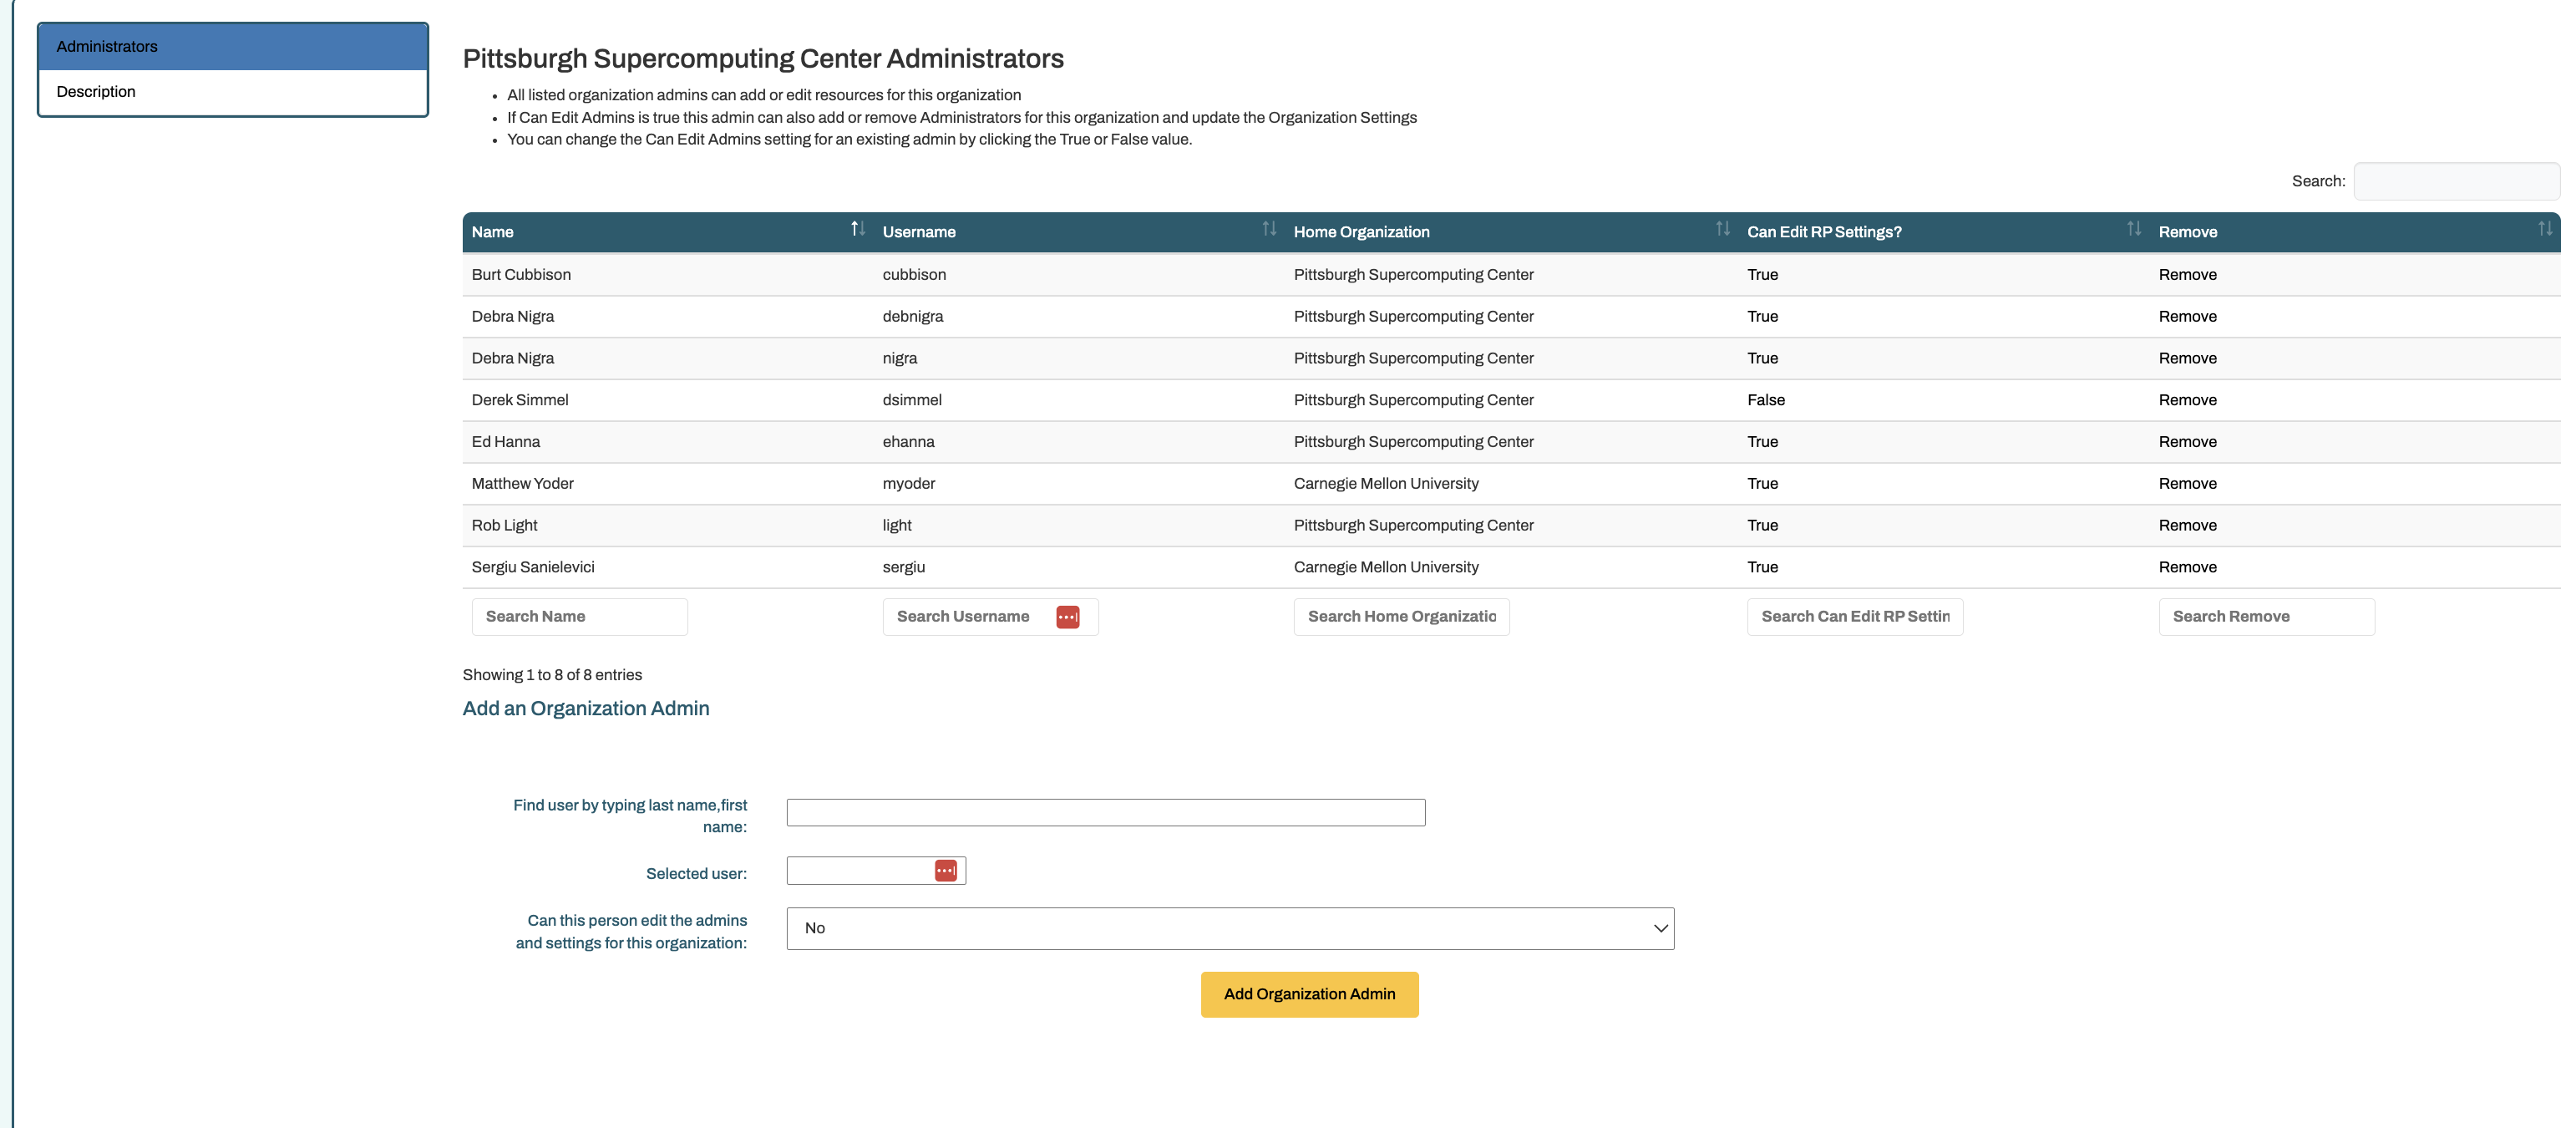
In addition to editing and adding infrastructure Service Provider Administrators can manage some additional information for their organization. Full CIDeR admins can edit this data for all service providers
Organization Administration
Click Organizations in the menu bar.
Click Edit for the organization you'd like to edit
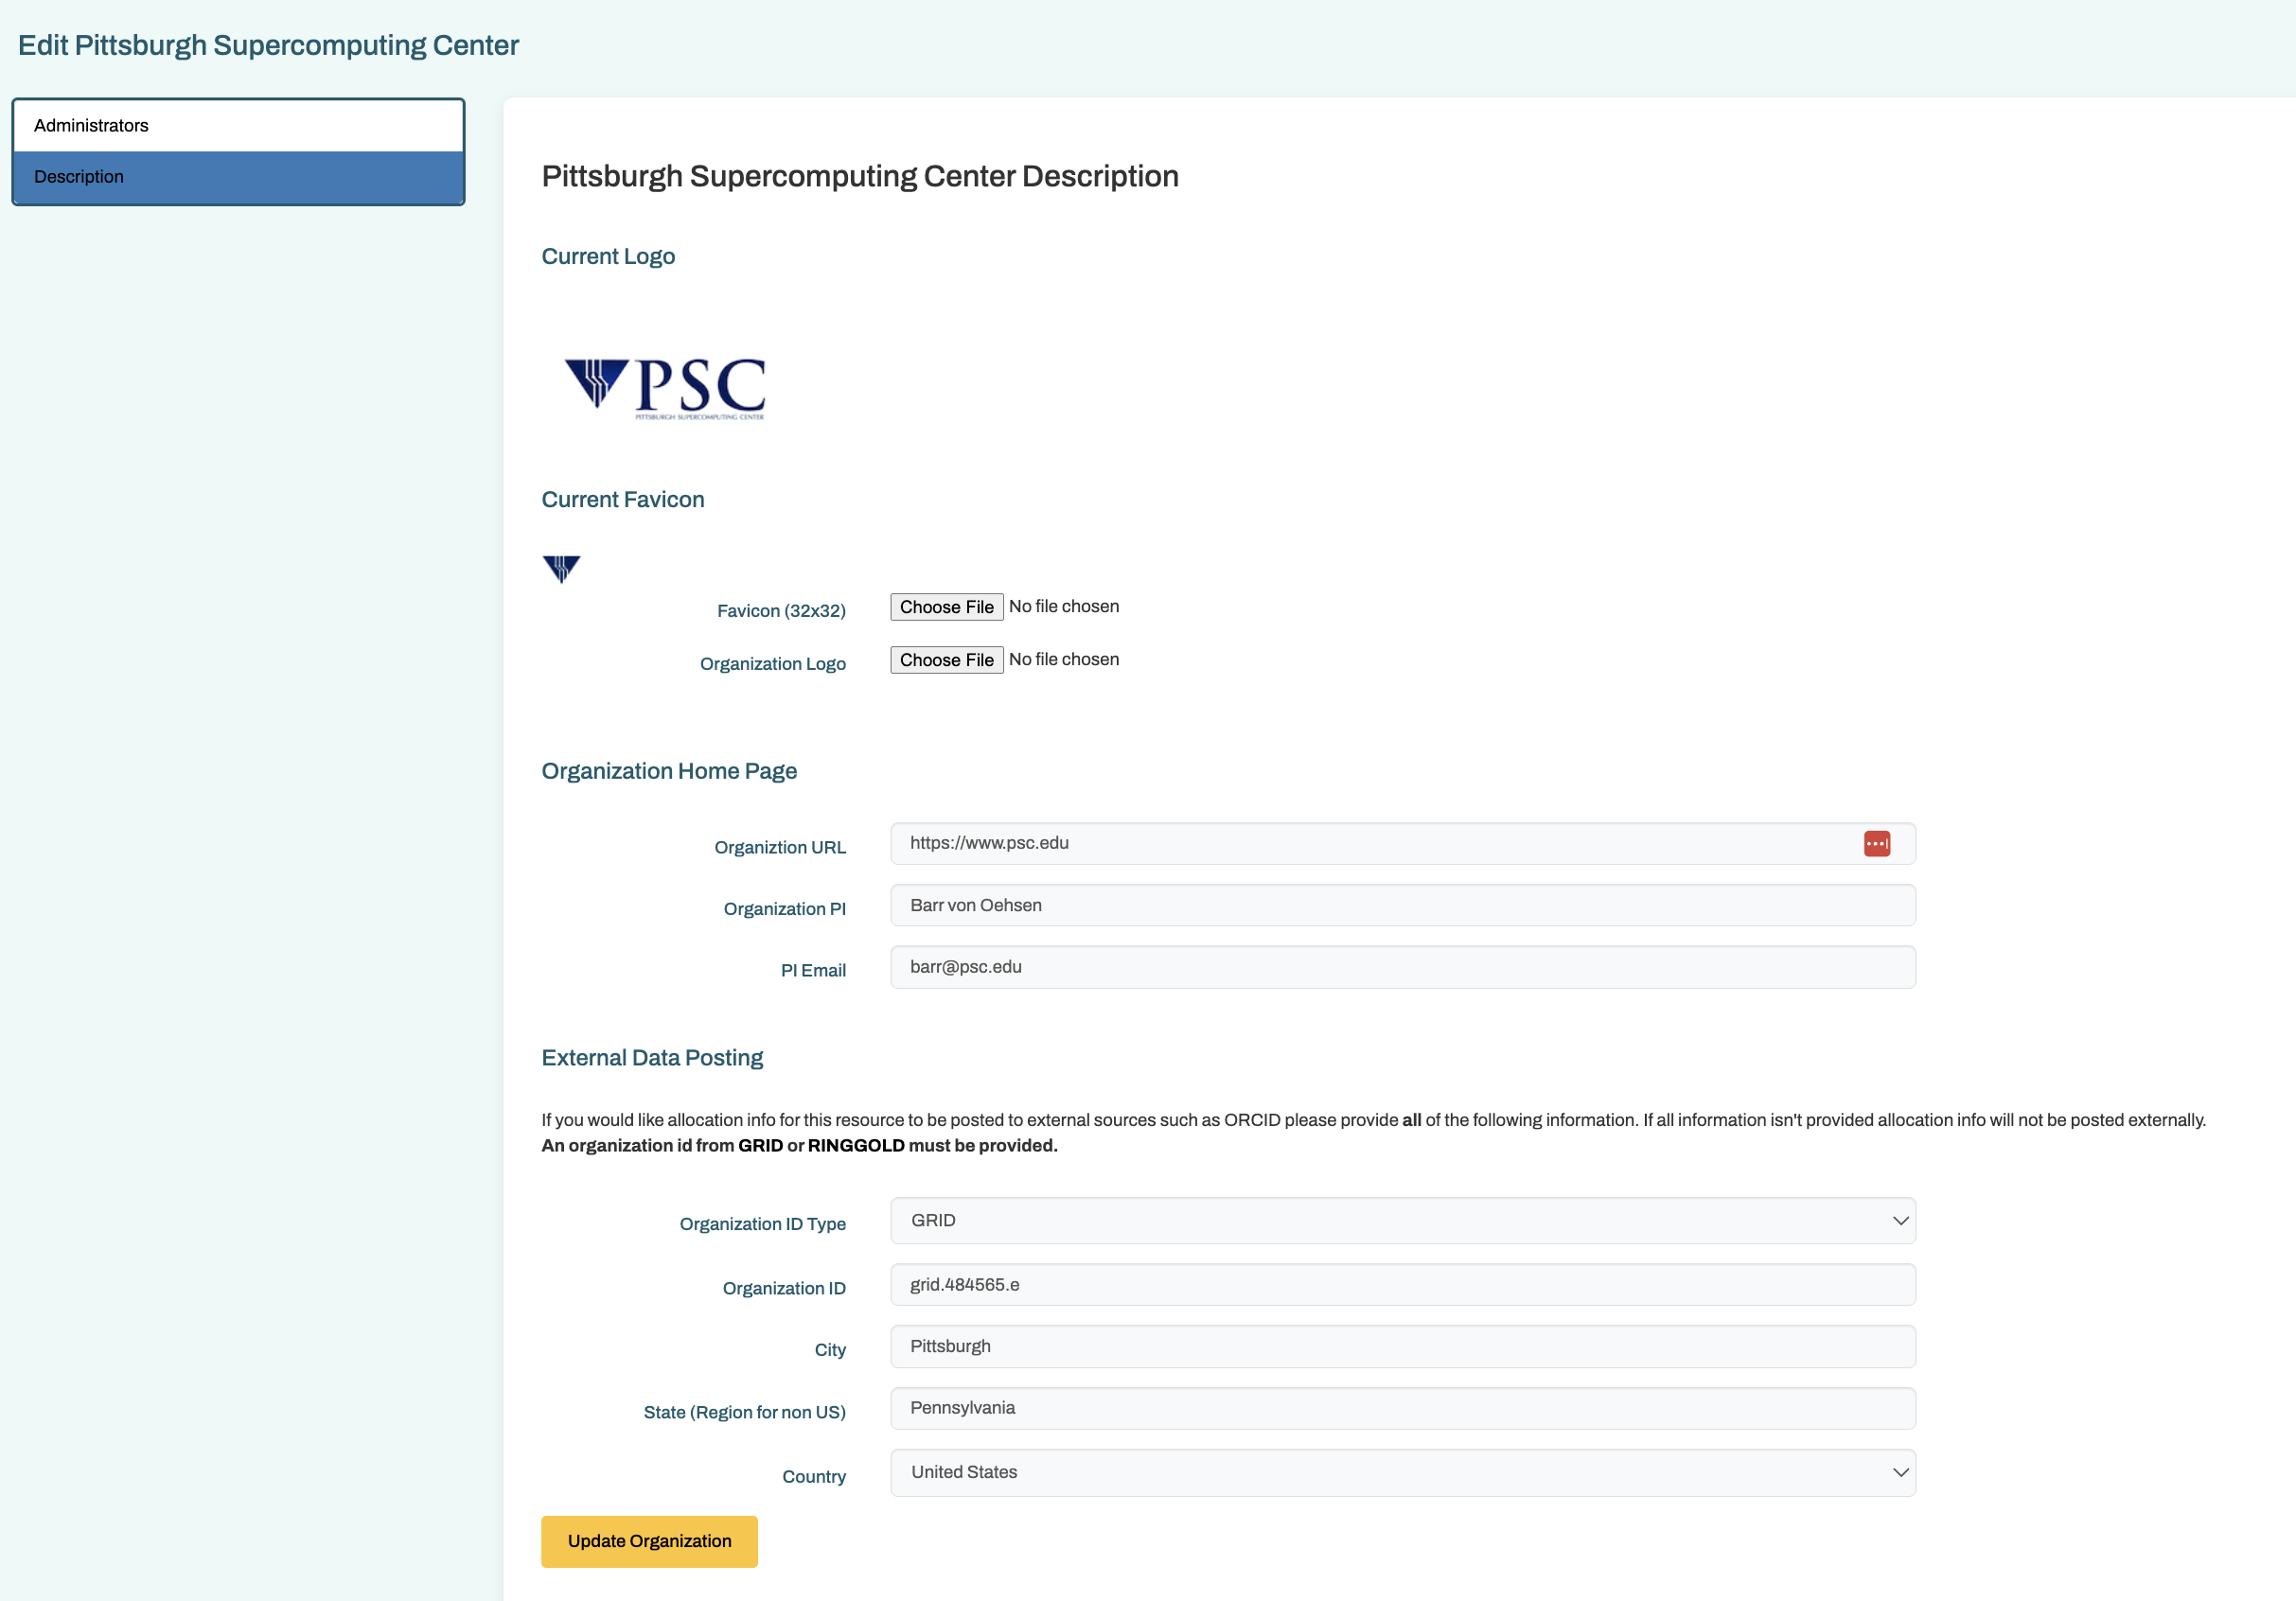
The Description section:
- allows you to set a logo and icon for your organization. These are used in the resource catalog and can be used in other locations in ACCESS.
- Provide a home page URL and PI information
- Provide organization identifiers so that your organization's resources can be included in data publishing
- Currently this is used to publish research allocation information to ORCiD
The Administrators section:
- Allows adding and removing administrators for this organization.
The "Can this person edit admins and settings for this organization?" questions means can this person edit these settings or can they only edit the infrastructure.
- Choose "Yes" if this person should be able to edit these organization settings.
CIDeR Administrators
Find these CIDeR Administration tools by clicking the "CIDeR Admins Area" in the menu bar
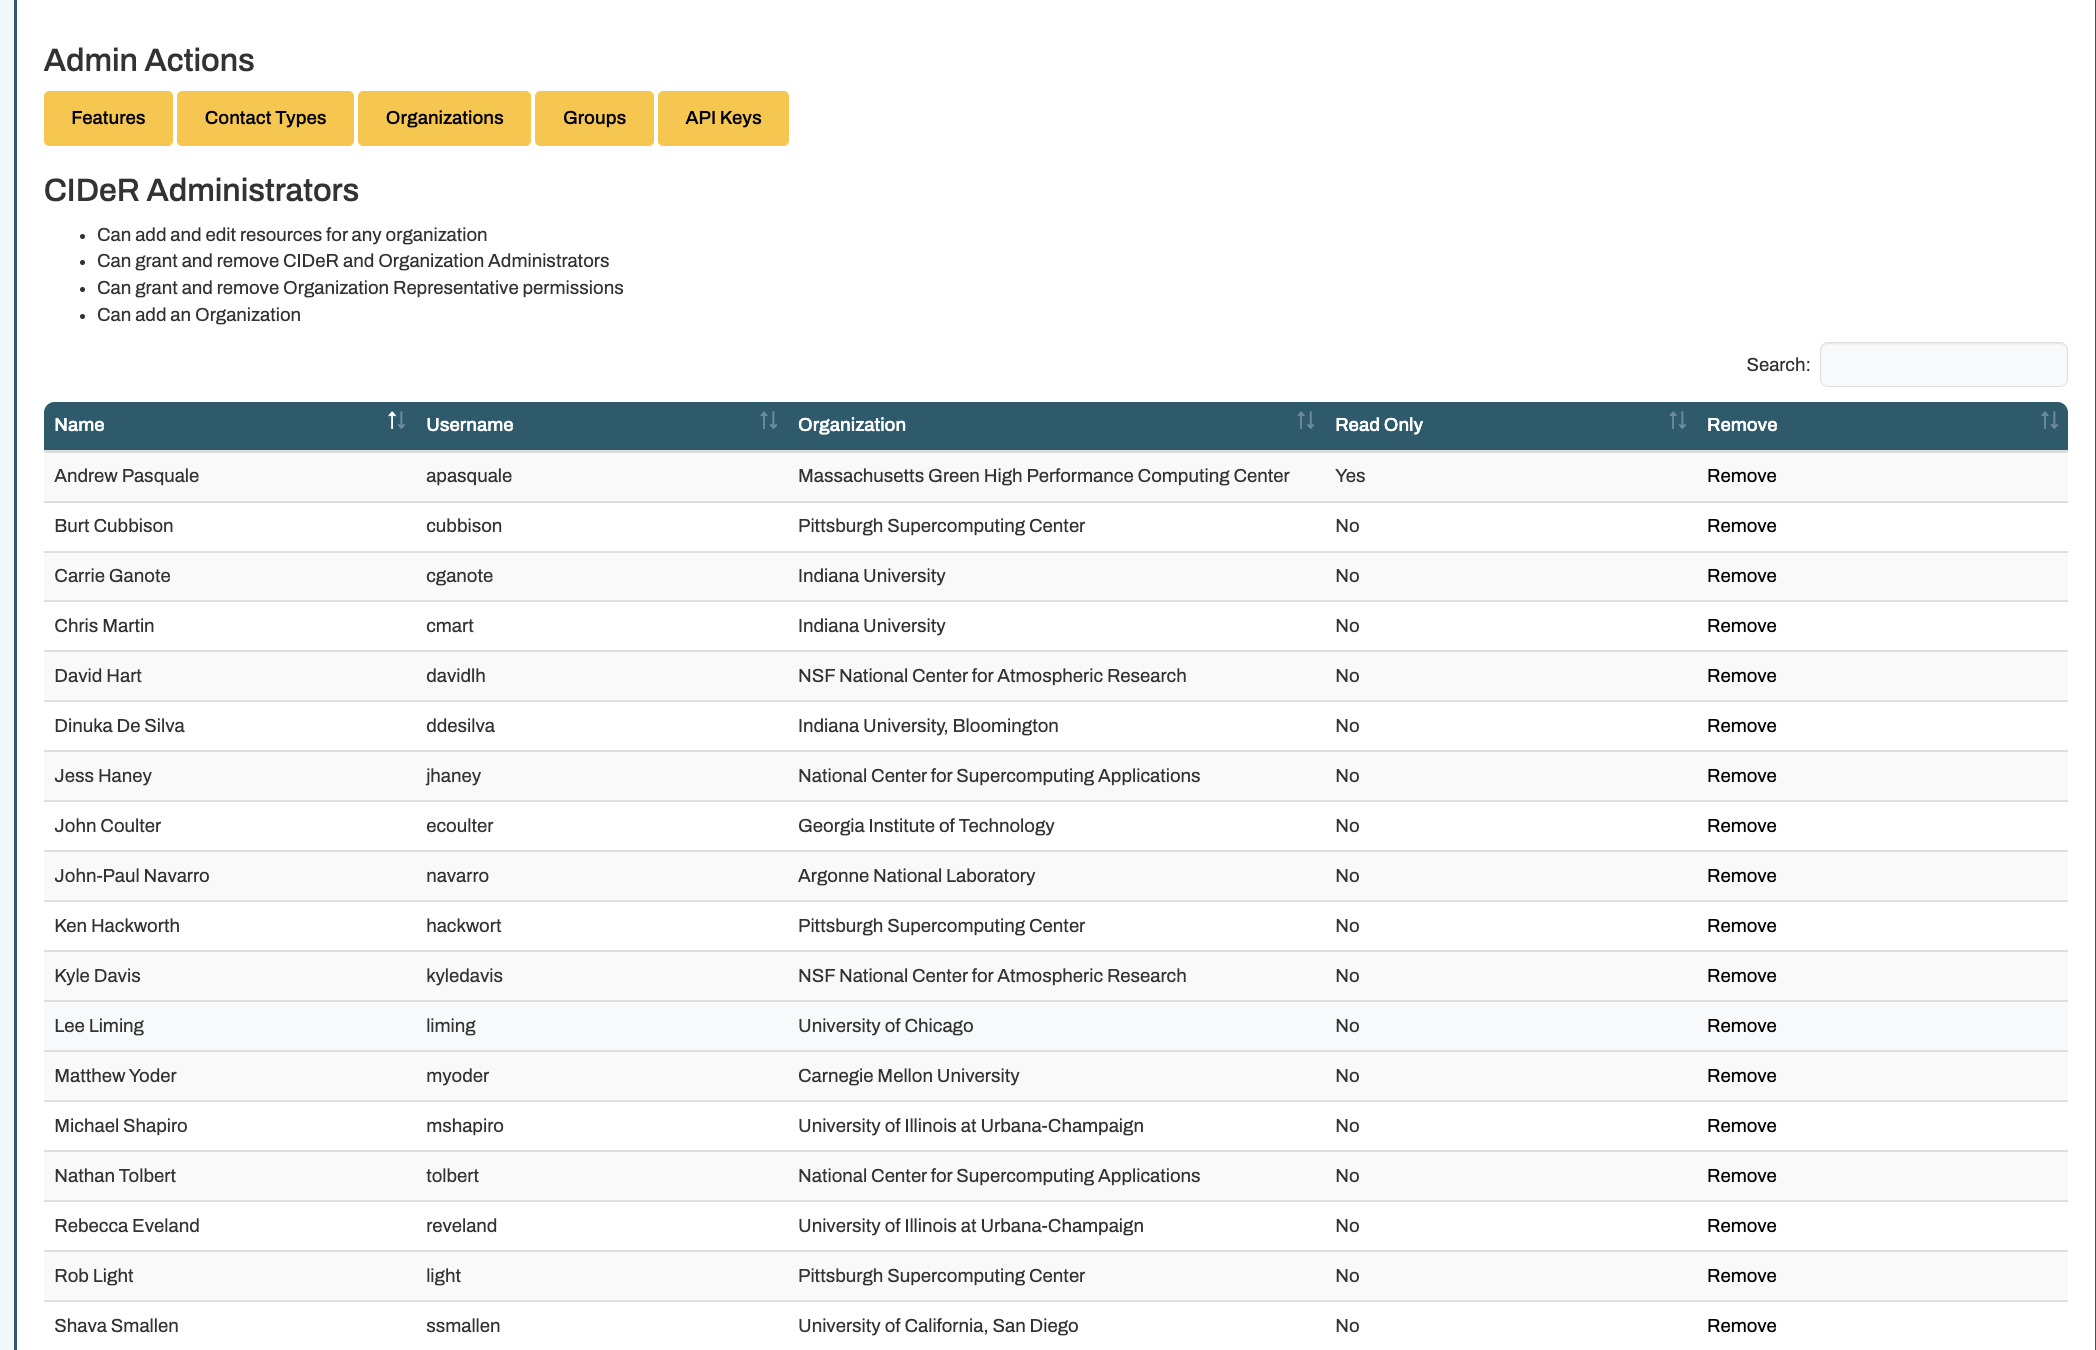
Manage CIDeR Admins
- The main CIDeR Admins Area page shows the list of full CIDeR Admins. New admins can be added at the bottom of the list. Anyone with an ACCESS ID should be available to add. There is some propagation time from account creation until an account will be available though.
- CIDeR Admins can also be deleted on this page.
Features
- In this section categories and features can be added and edited. These are used for internal categorization as well as displaying and filtering infrastructure in the resource catalog
Contact Types
- Add and edit the contact types that used in the infrastructure description.
Organizations
- Organizations can be added as Service Providers at the bottom of the organizations list after clicking the Organizations button. If the organization you would like to add doesn't appear in the search list, you should create an ACCESS ticket asking for it to be be added. The full organization list is imported from the Allocations database so it will need to be added there first.
- Organization data can be edited by clicking edit next to the organization that you wish to edit. Look at the Service Provider Administration section for more detail on this.
Groups
- Groups and Group Types can be added and edited here.
- Group Types should be in the same format as Global Resource IDs
- example: resource-catalog.access-ci.org
- Groups are used to collect infrastructure.
- Example: Bridges-2 group contains bridges2-rm, bridges2-gpu etc.
- Group membership can also be managed on this page, saving an admin from going to each infrastructure individually
API Keys
- This is the same page as click API Keys in the header menu and is detailed more in the CIDeR API section
- Manage your own API Keys
- Remove or Reassign API Keys for other users.
CIDeR API
CIDeR provides an API for access to the infrastructure data. The API is public with documentation available by clicking the "API Docs" item in the menu bar. Most data can be retrieved via the API and does not require any authentication.
Protected Data currently includes the contact information for infrastructure. This is included in the API output if a valid API Key is provided. View the API Docs for more information on how to authenticate to the API.
API Keys can be created by anyone with full CIDeR or Service Provider Admin permissions. To create an API Key click the API Keys item in the menu bar. CIDeR does not save the key itself so if you generate a key be sure to save it securely before closing the dialog that presents the key to you. Unused API Keys can be removed here as well.
CIDeR Admins can also view, remove or reassign API Keys for all users from the API Keys page.